使用 ansible+jenkins+gitlab 实现自动化发布和手动回滚前端项目 02
承接上文
上文讲到,jenkins 如何跟 gitlab 协同合作,实现从 gitlab 拉取代码构建,本文将会讲到,利用 gitlab 钩子实现自动化的构建发布
请把本文结合前文看,要不然你看不懂~
使用 ansible+jenkins+gitlab 实现自动化发布和手动回滚前端项目 01
https://www.itwordsweb.net/archives/auto_01
gitlab 钩子与 jenkins
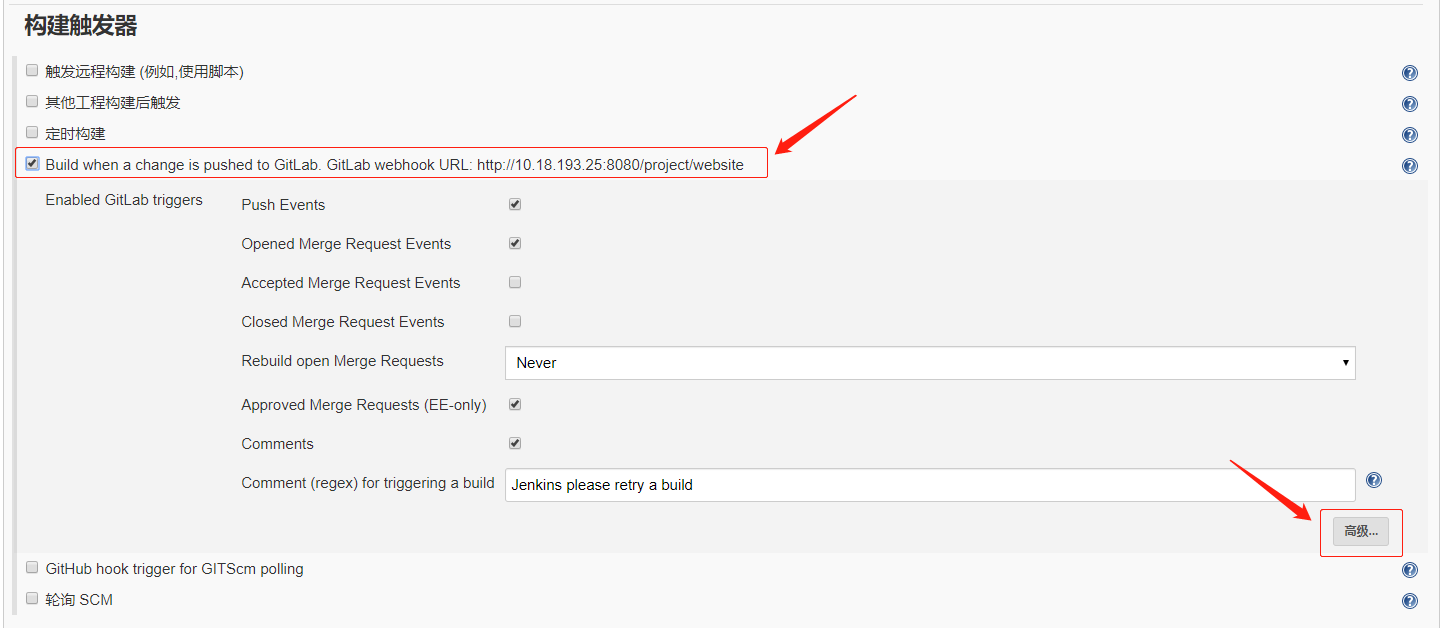
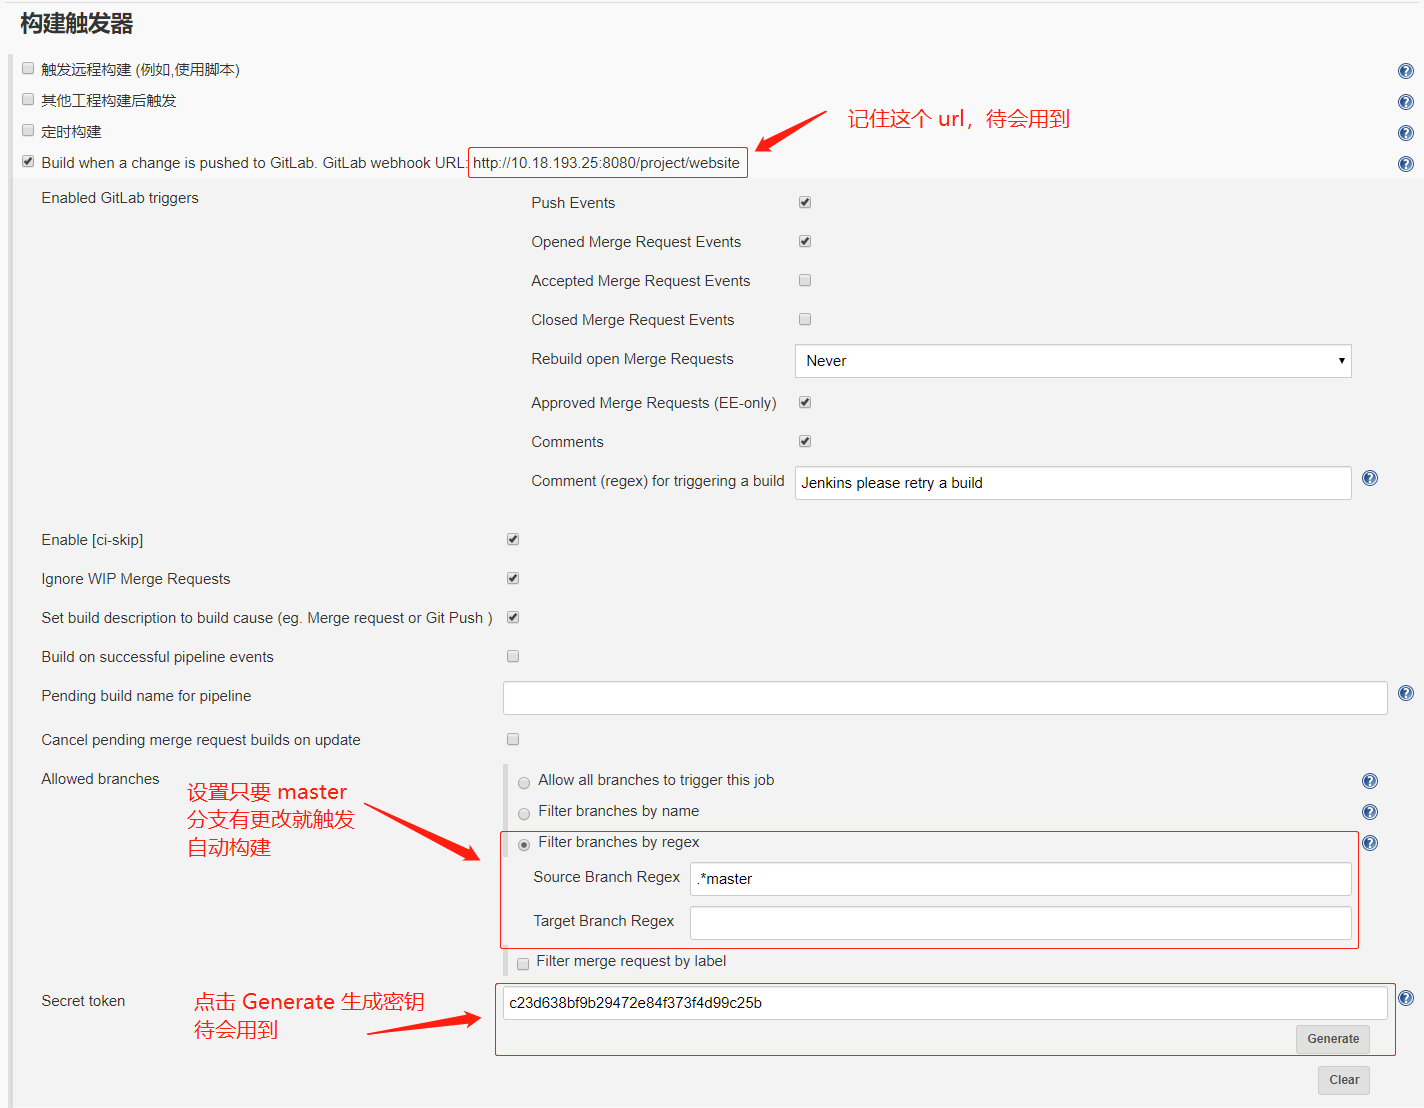
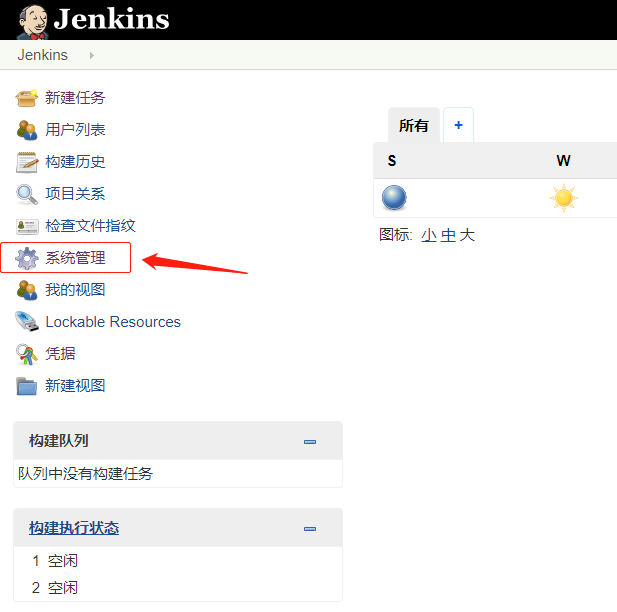
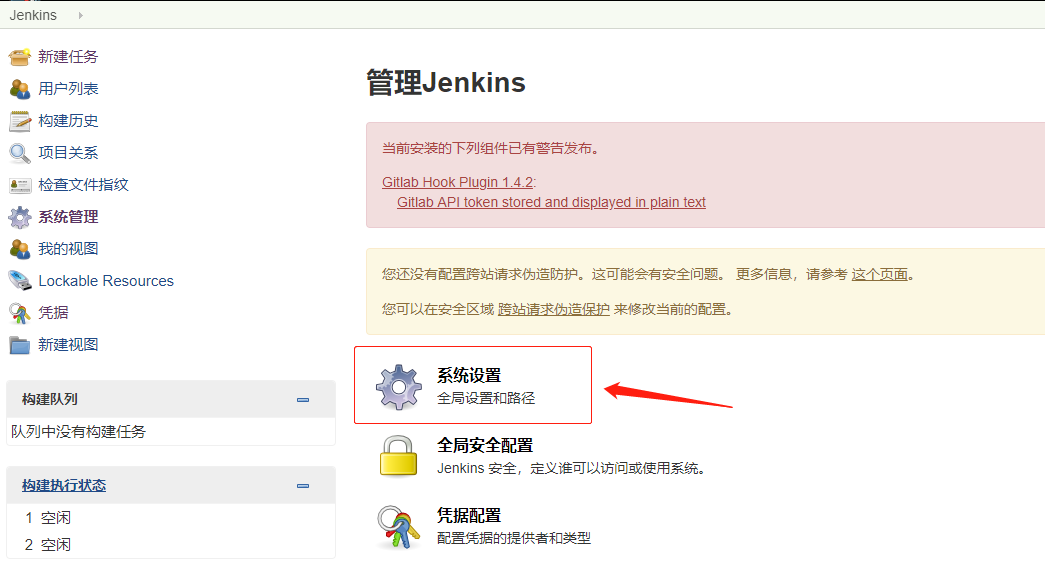
首先配置 jenkins 项目,承接上文,还是 website 项目,跟着下面的图片操作即可,最后记得点保存呀
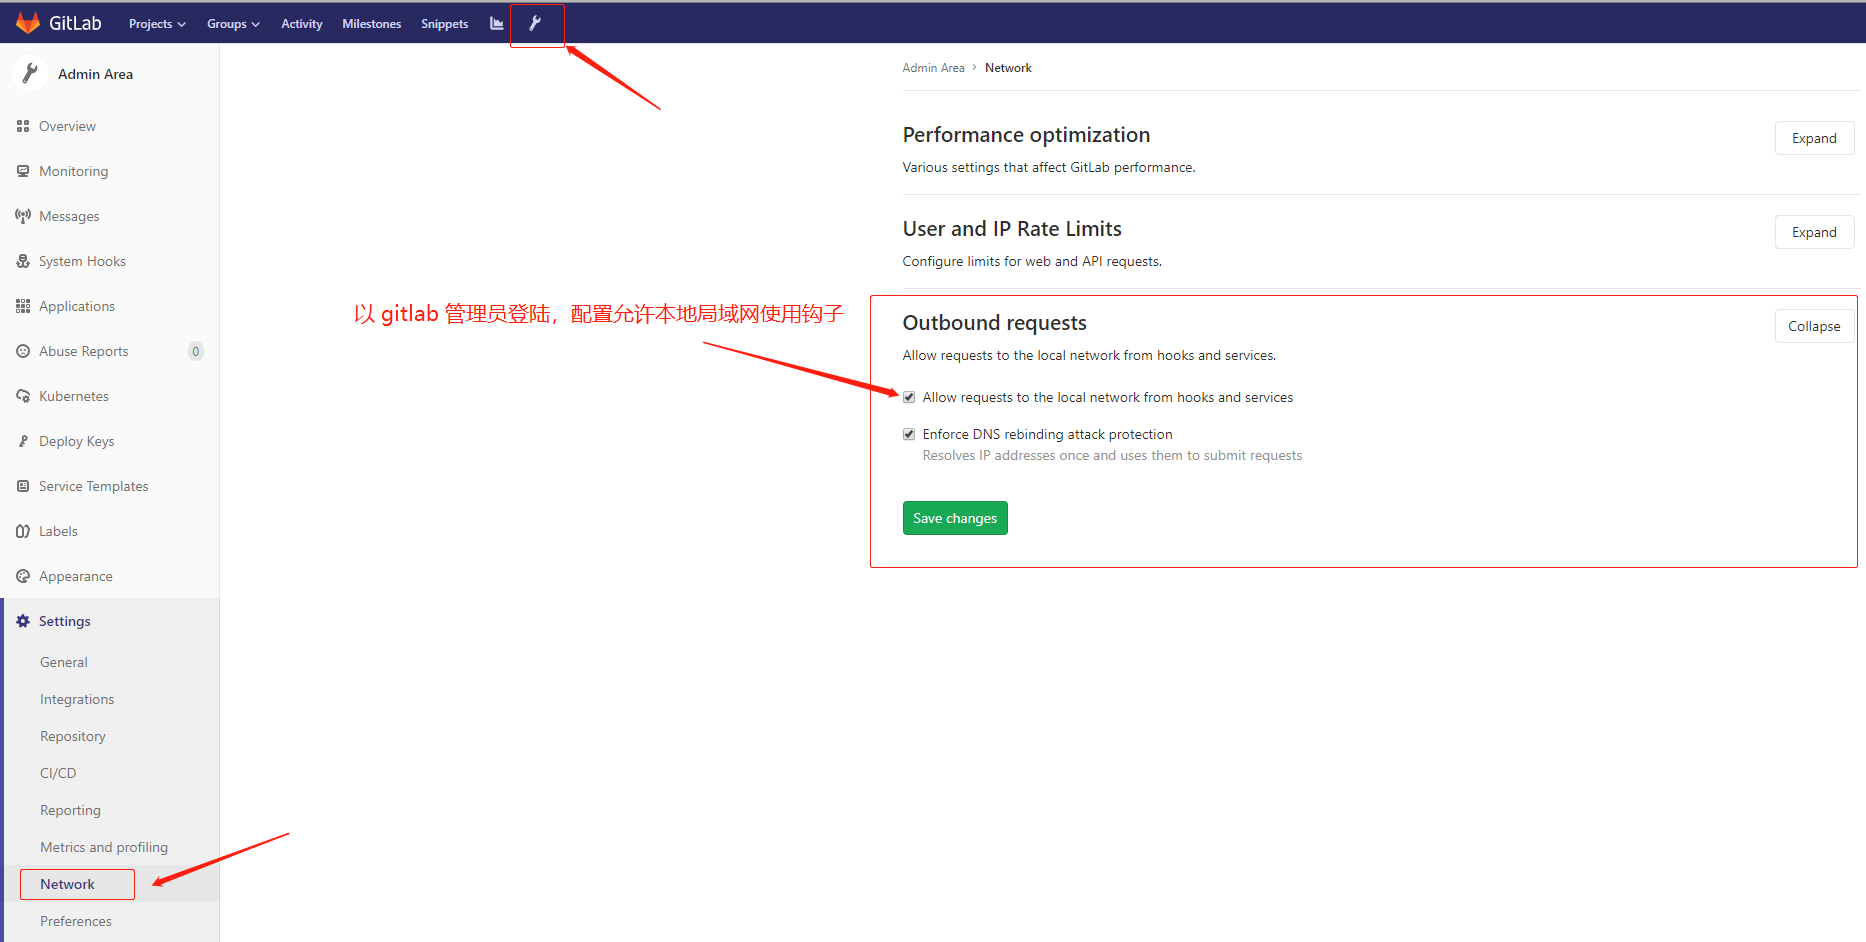
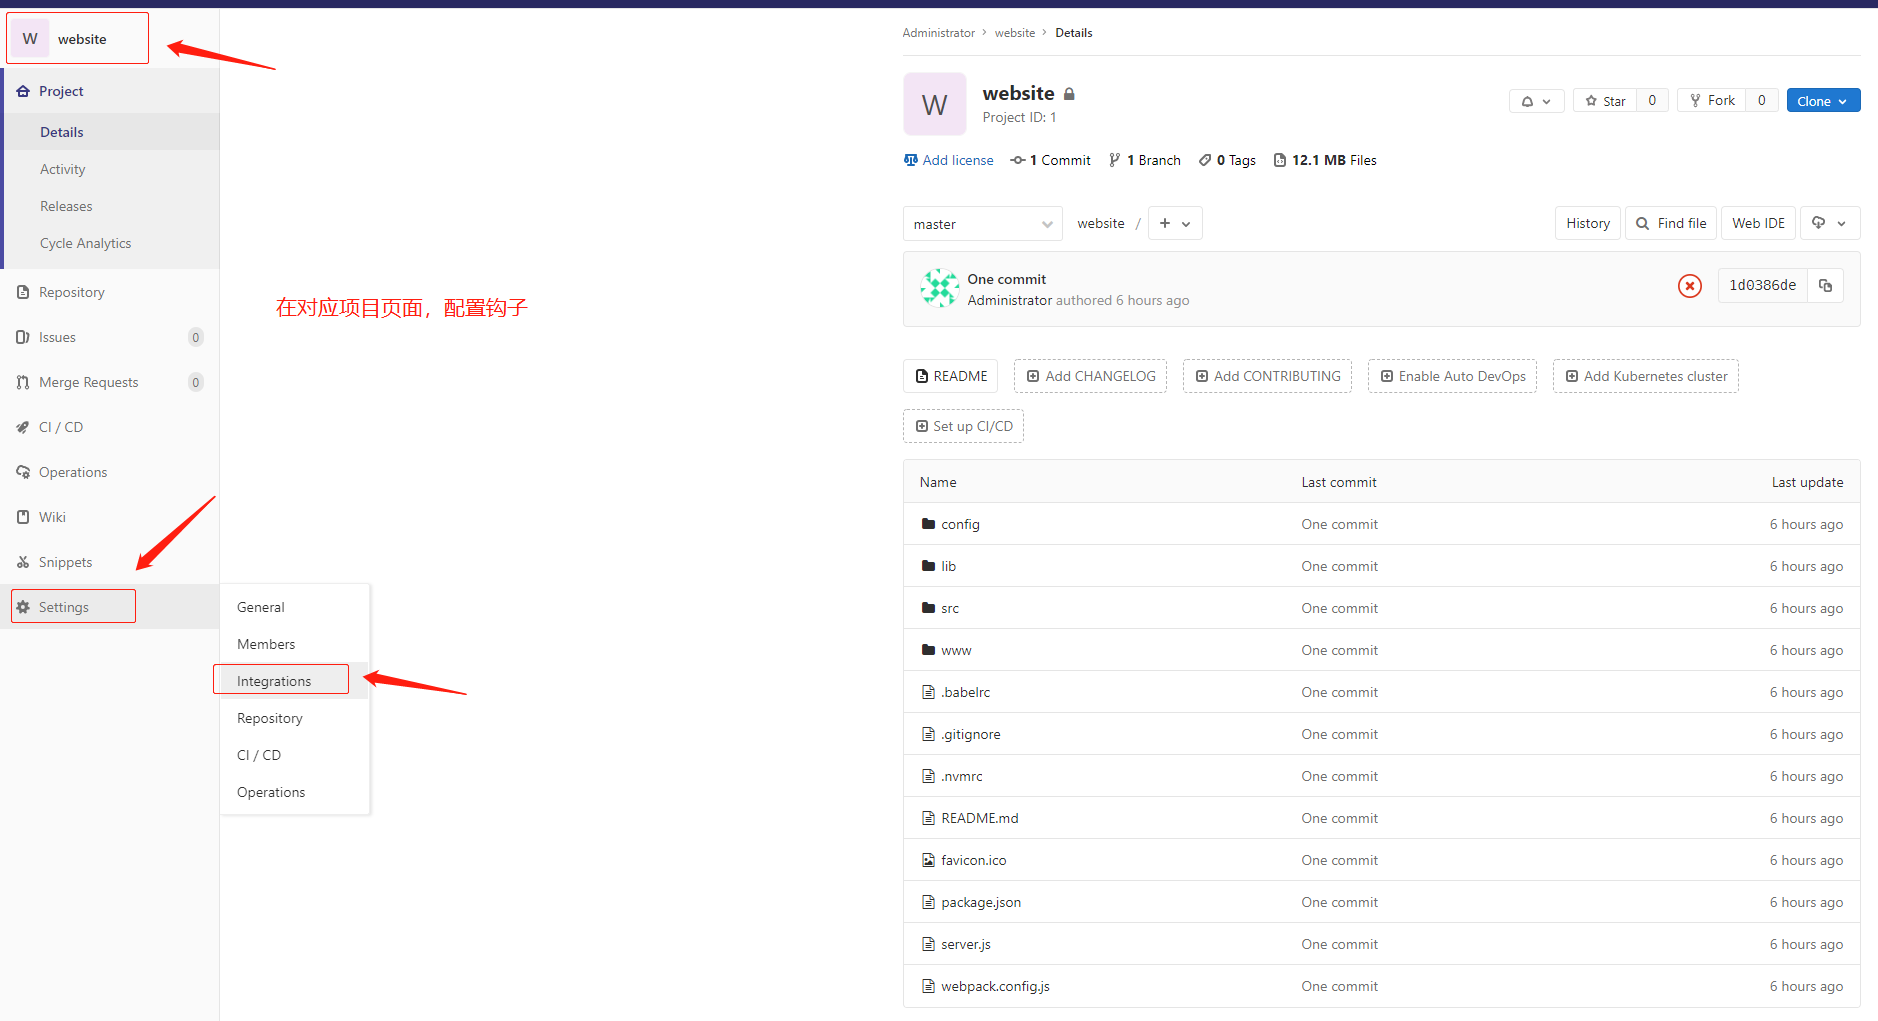
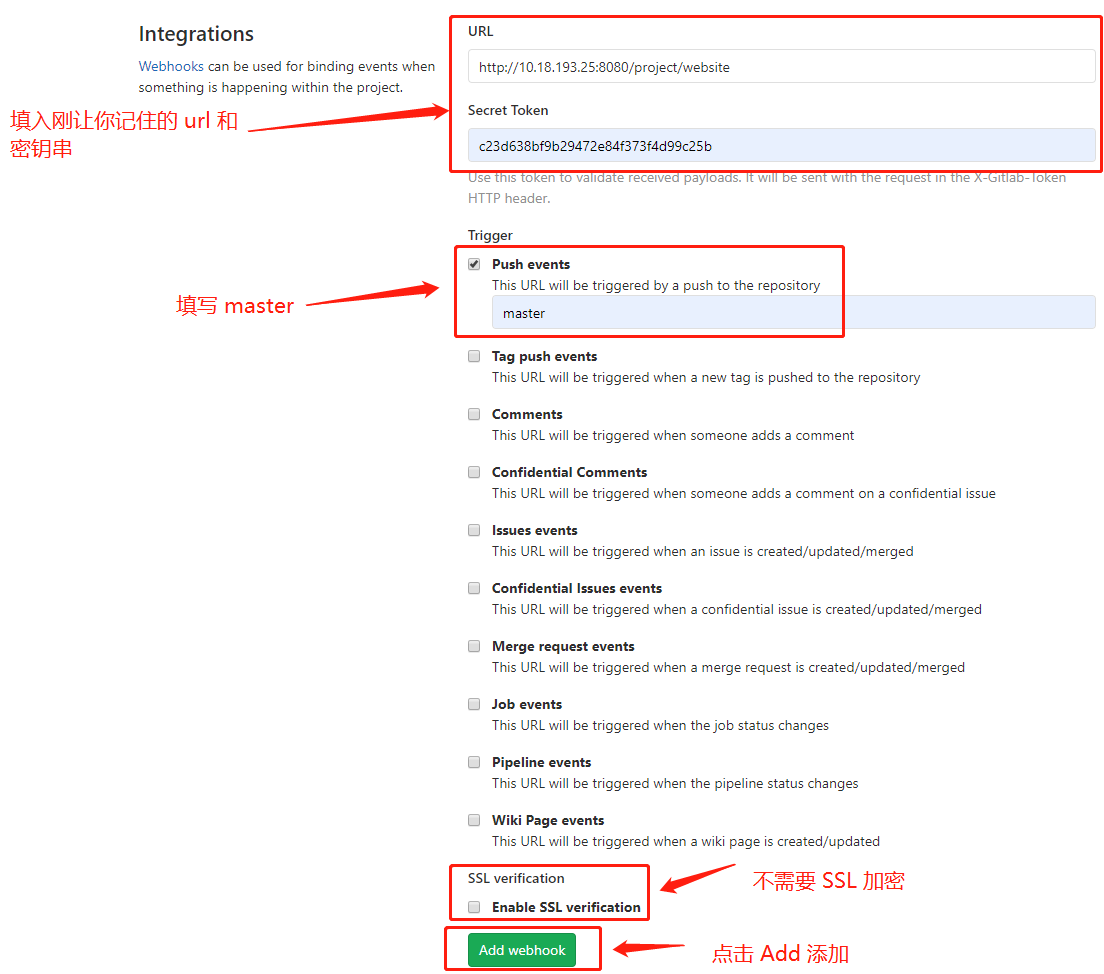
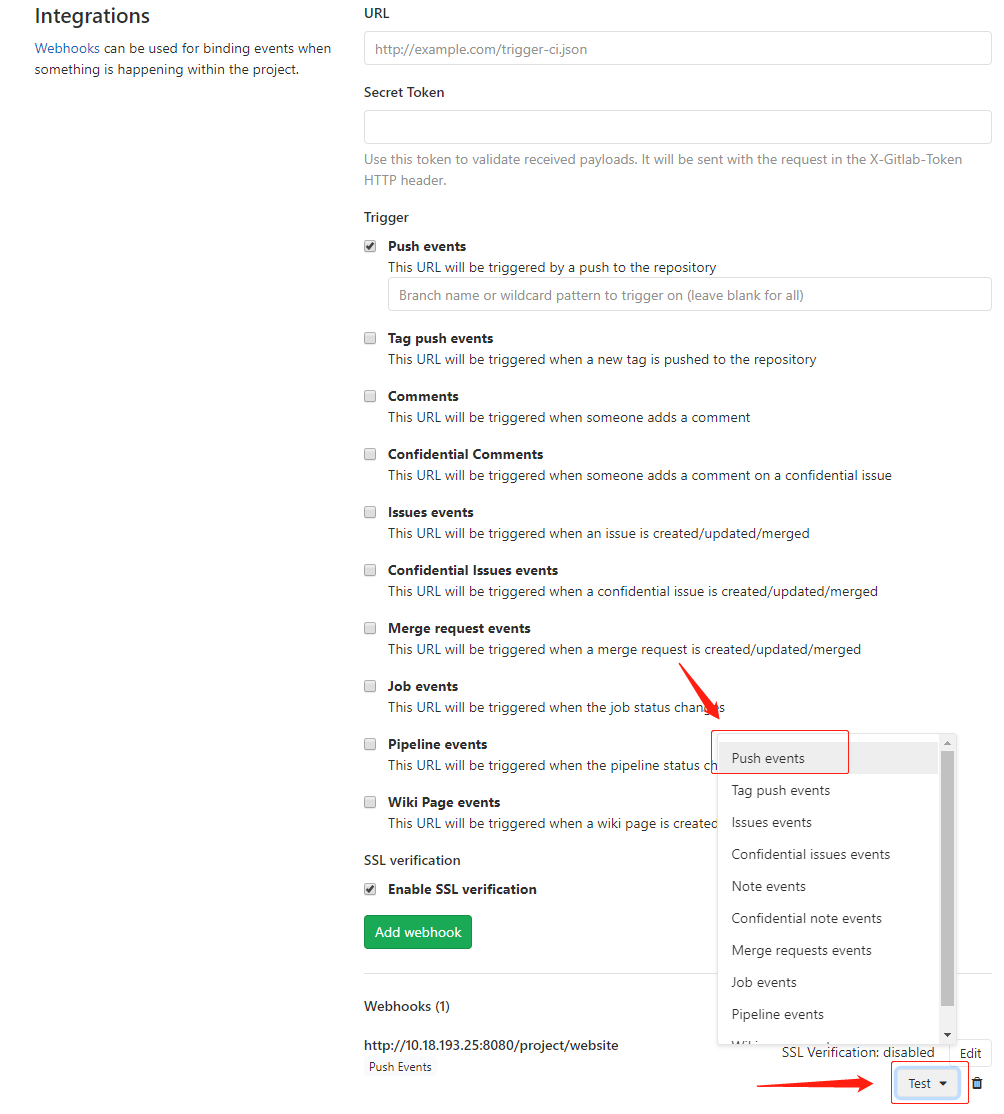
配置 gitlab 钩子
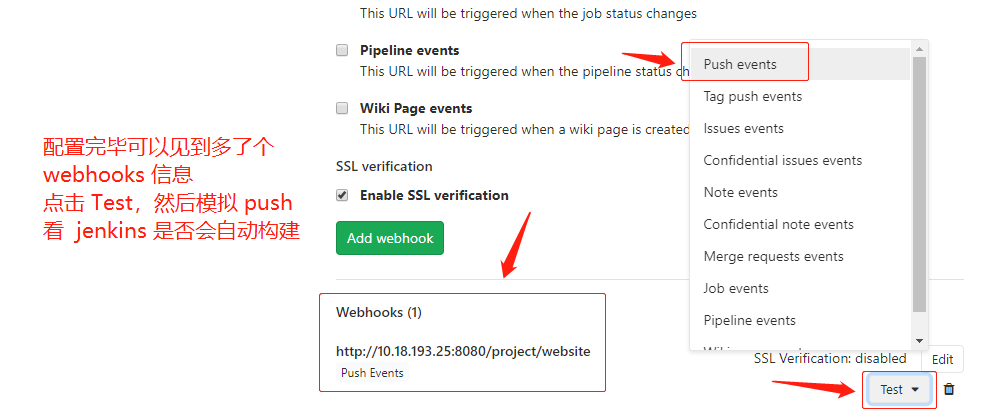
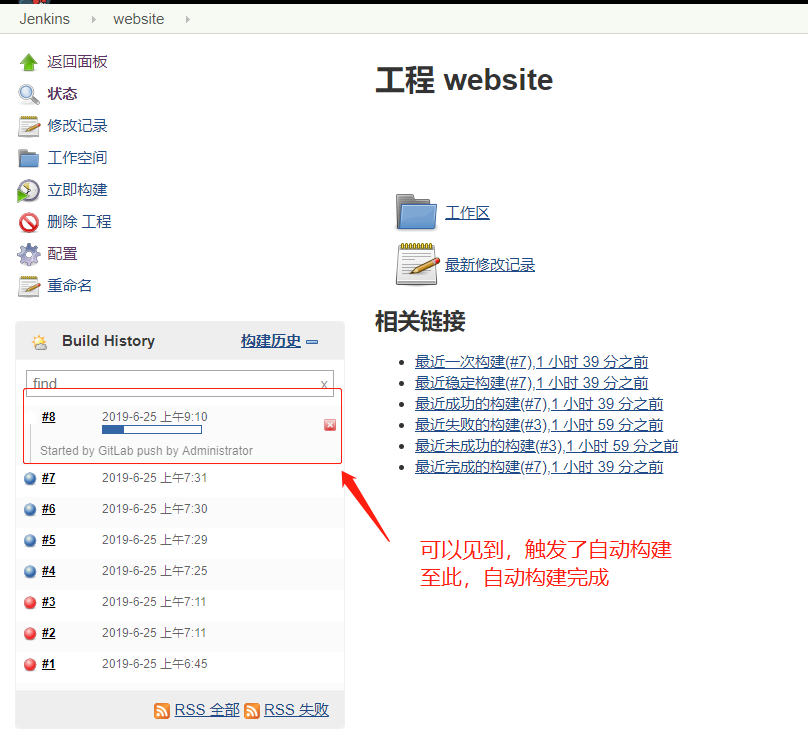
测试是否生效
jenkins 构建完成直接发布到 web 服务器
首先在 web 服务器部署 nginx 和建立用来存放前端项目的目录
还有我的项目依赖于 nodejs,所以我这里还安装了 nodejs 相关的东西
具体需求具体分析,这里仅做参考
[root@dev-of-runfa-27 ~]# yum -y install nginx
[root@dev-of-runfa-27 ~]# mkdir -p /data/website
[root@dev-of-runfa-27 ~]# echo '' > /etc/nginx/nginx.conf
[root@dev-of-runfa-27 ~]# vim /etc/nginx/nginx.conf
user nginx;
worker_processes auto;
error_log /var/log/nginx/error.log;
pid /run/nginx.pid;
include /usr/share/nginx/modules/*.conf;
events {
    worker_connections 1024;
}
http {
    log_format  main  '$remote_addr - $remote_user [$time_local] "$request" '
                      '$status $body_bytes_sent "$http_referer" '
                      '"$http_user_agent" "$http_x_forwarded_for"';
    access_log  /var/log/nginx/access.log  main;
    sendfile on;
    tcp_nopush on;
    tcp_nodelay on;
    keepalive_timeout 65;
    types_hash_max_size 2048;
    gzip on;
    include /etc/nginx/mime.types;
    default_type application/octet-stream;
    include /etc/nginx/conf.d/*.conf;
}
[root@dev-of-runfa-27 ~]# vim /etc/nginx/conf.d/www.conf
server {
    listen 80;
    server_name 10.18.193.27;
    location /favicon.ico {
         root /data/website;
    }
    location / {
        proxy_pass http://127.0.0.1:9090;
    }
    error_page 404 /404.html;
        location = /40x.html {
    }
    error_page 500 502 503 504 /50x.html;
        location = /50x.html {
    }
}
[root@dev-of-runfa-27 ~]# systemctl start nginx.service
[root@dev-of-runfa-27 ~]# systemctl status nginx.service
● nginx.service - The nginx HTTP and reverse proxy server
   Loaded: loaded (/usr/lib/systemd/system/nginx.service; disabled; vendor preset: disabled)
   Active: active (running) since 二 2019-06-25 17:37:19 CST; 3s ago
  Process: 26196 ExecStart=/usr/sbin/nginx (code=exited, status=0/SUCCESS)
  Process: 26193 ExecStartPre=/usr/sbin/nginx -t (code=exited, status=0/SUCCESS)
  Process: 26191 ExecStartPre=/usr/bin/rm -f /run/nginx.pid (code=exited, status=0/SUCCESS)
 Main PID: 26199 (nginx)
    Tasks: 3
   Memory: 5.5M
   CGroup: /system.slice/nginx.service
           ├─26199 nginx: master process /usr/sbin/nginx
           ├─26200 nginx: worker process
           └─26201 nginx: worker process

6月 25 17:37:18 dev-of-runfa-27 systemd[1]: Starting The nginx HTTP and reverse proxy server...
6月 25 17:37:19 dev-of-runfa-27 nginx[26193]: nginx: the configuration file /etc/nginx/nginx.conf syntax is ok
6月 25 17:37:19 dev-of-runfa-27 nginx[26193]: nginx: configuration file /etc/nginx/nginx.conf test is successful
6月 25 17:37:19 dev-of-runfa-27 systemd[1]: Started The nginx HTTP and reverse proxy server.
[root@dev-of-runfa-27 ~]# wget https://nodejs.org/dist/v8.10.0/node-v8.10.0-linux-x64.tar.xz
[root@dev-of-runfa-27 ~]# tar xvf node-v8.10.0-linux-x64.tar.xz
[root@dev-of-runfa-27 ~]# mv node-v8.10.0-linux-x64 /usr/local/node-v8.10.0
[root@dev-of-runfa-27 ~]# ln -sf /usr/local/node-v8.10.0/bin/node /usr/local/bin/
[root@dev-of-runfa-27 ~]# ln -sf /usr/local/node-v8.10.0/bin/npm /usr/local/bin/
[root@dev-of-runfa-27 ~]# node -v
v8.10.0
[root@dev-of-runfa-27 ~]# npm -v
5.6.0
[root@dev-of-runfa-27 ~]# npm install -g pm2
[root@dev-of-runfa-27 ~]# ln -sf /usr/local/node-v8.10.0/bin/pm2 /usr/local/bin/
[root@dev-of-runfa-27 ~]# pm2 -v
3.5.1
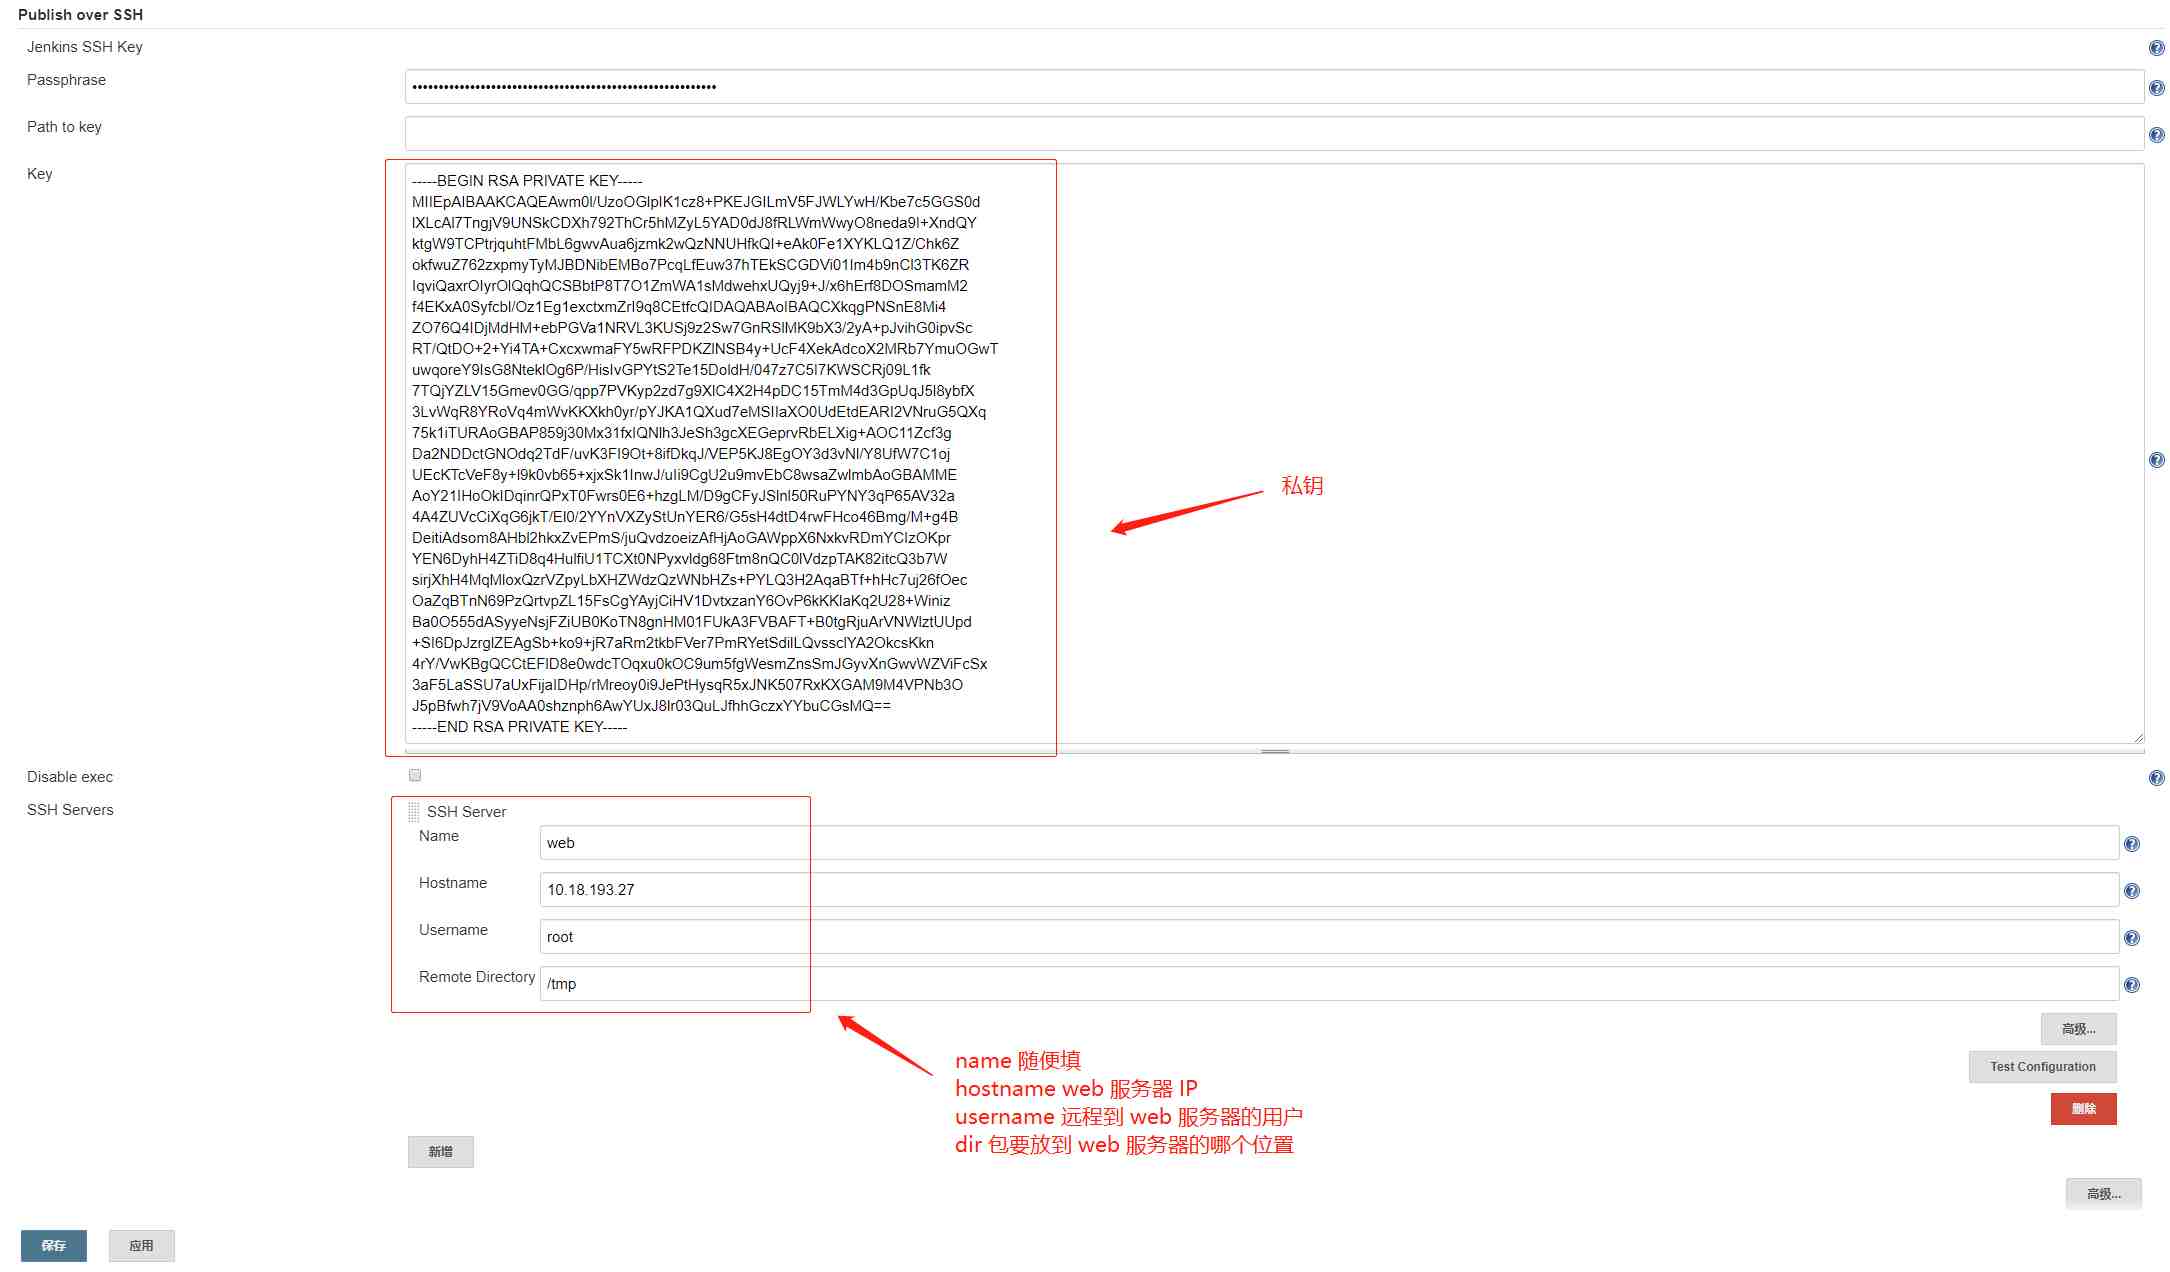
配置 jenkins 和 web 服务器之间的 ssh 加密,此处还是使用之前生成的私钥和公钥
私钥放 jenkins,公钥放 web 服务器的 authorized_keys 文件
先看放 jenkins
然后把公钥放到 web 服务器上
[root@dev-of-runfa-27 ~]# mkdir .ssh
[root@dev-of-runfa-27 ~]# vim .ssh/authorized_keys
ssh-rsa AAAAB3NzaC1yc2EAAAADAQABAAABAQDCbSX9TOg4aWkgrVzPz48oQkYguZXkUlYtjAf8pt7tzkYZLR2VctwCXtOeCNX1Q1KQINeHv3ZOEKvmExnIvlgAPR0nx9EtaZbDI7yd51r0j5ed1BiS2Bb1MI+2uOq6G0UxsvqDC8C5rqPOaTbBDM01Qd+RAj54CT    QV7VdgotDVn8KGTpmiR/C5nvrbPGmbJPIwkEM2JsQwGjs9yot8S7DfuFMSRIIYNWLTUibhv2cKXdMrplEiq+JBrGs4jKs6VCqFAJIFu0/xPs7VmZYDWwx3B6HFRDKP34n/HqESt/wM5KZqYzZ/gQrEDRLJ9xuX87PUSDV7Fy3GZmsj2rwIS19x root@dev-of-runfa-25
[root@dev-of-runfa-27 ~]# chmod 700 .ssh
[root@dev-of-runfa-27 ~]# chmod 600 .ssh/authorized_keys
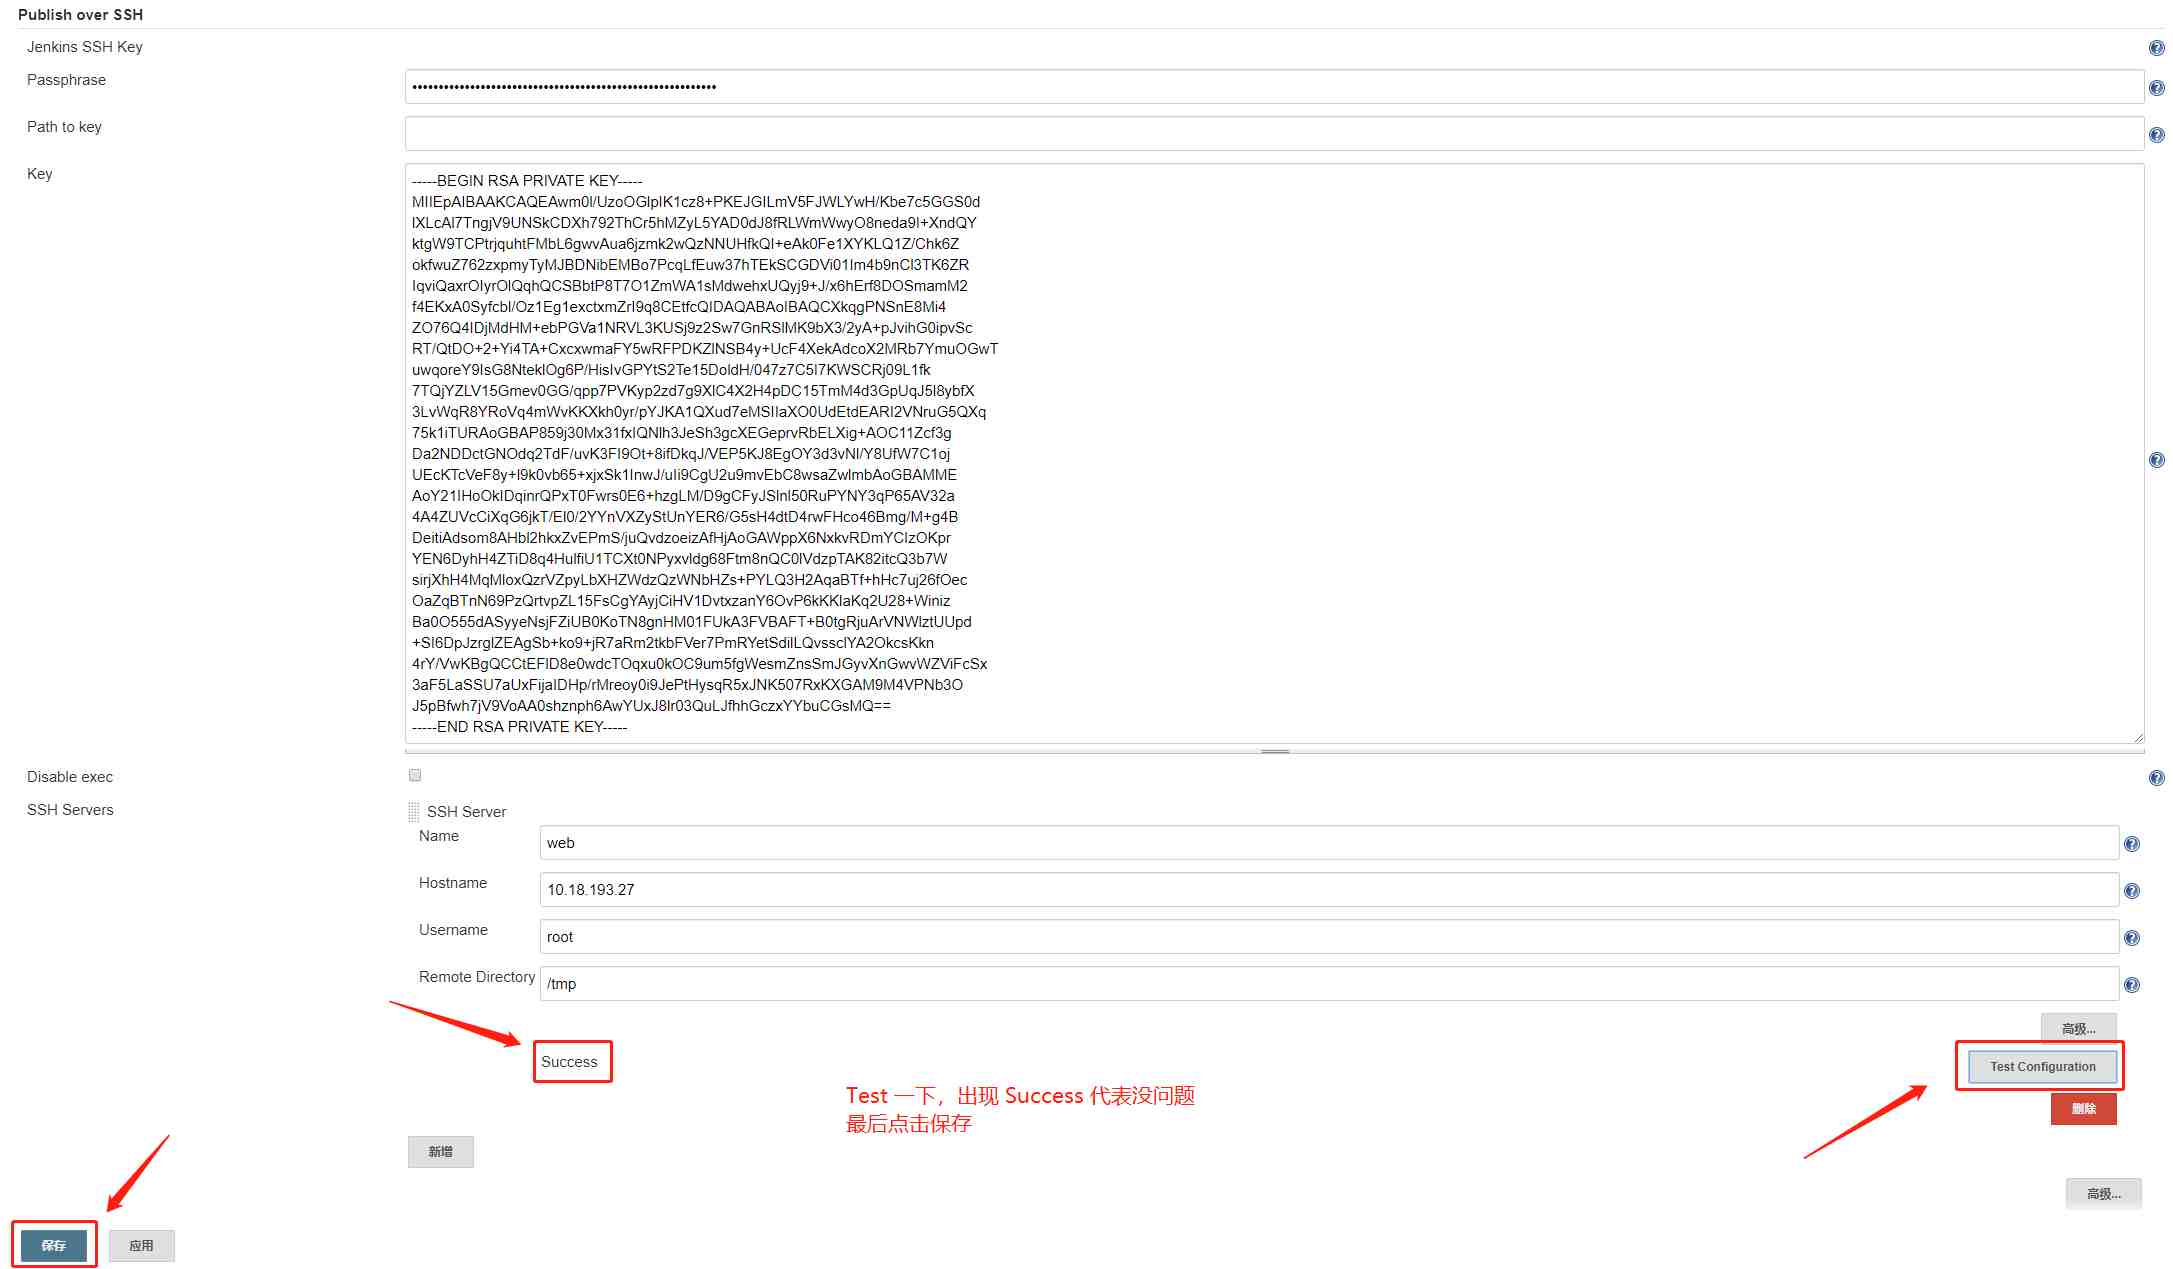
返回 jenkins 上,测试一下是否正常
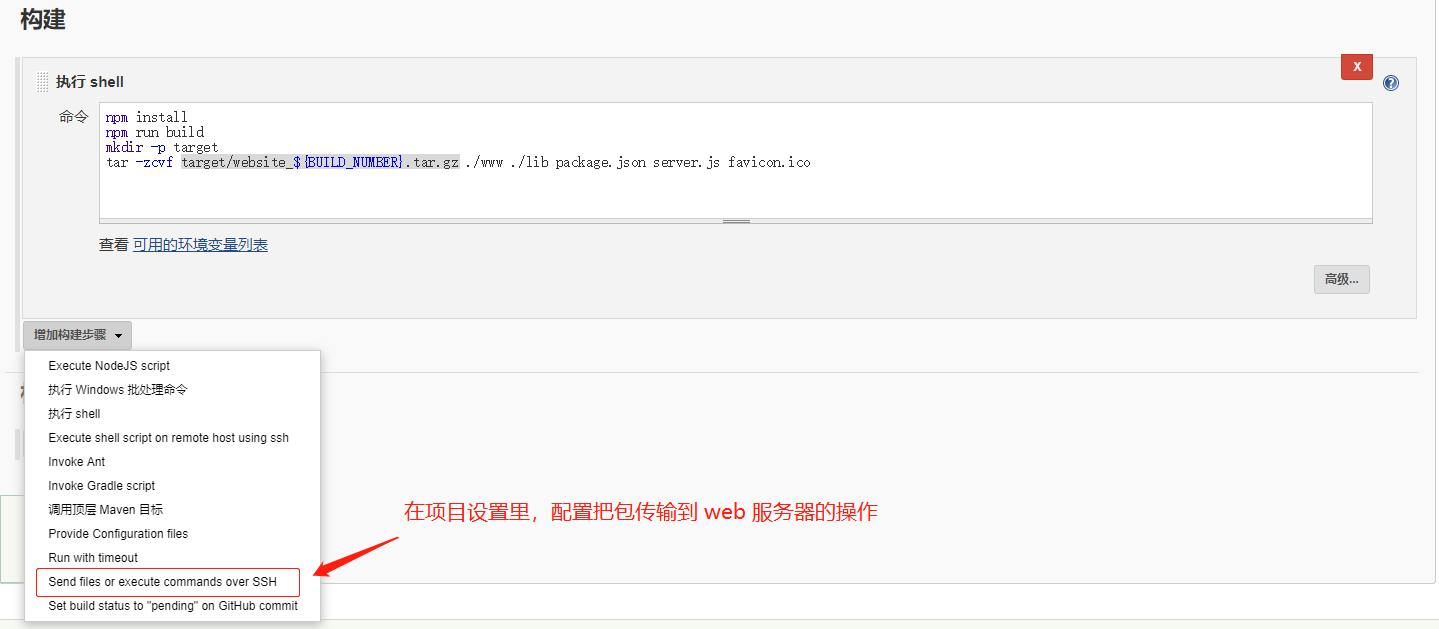
配置 jenkins 上的项目,使构建完成直接发布
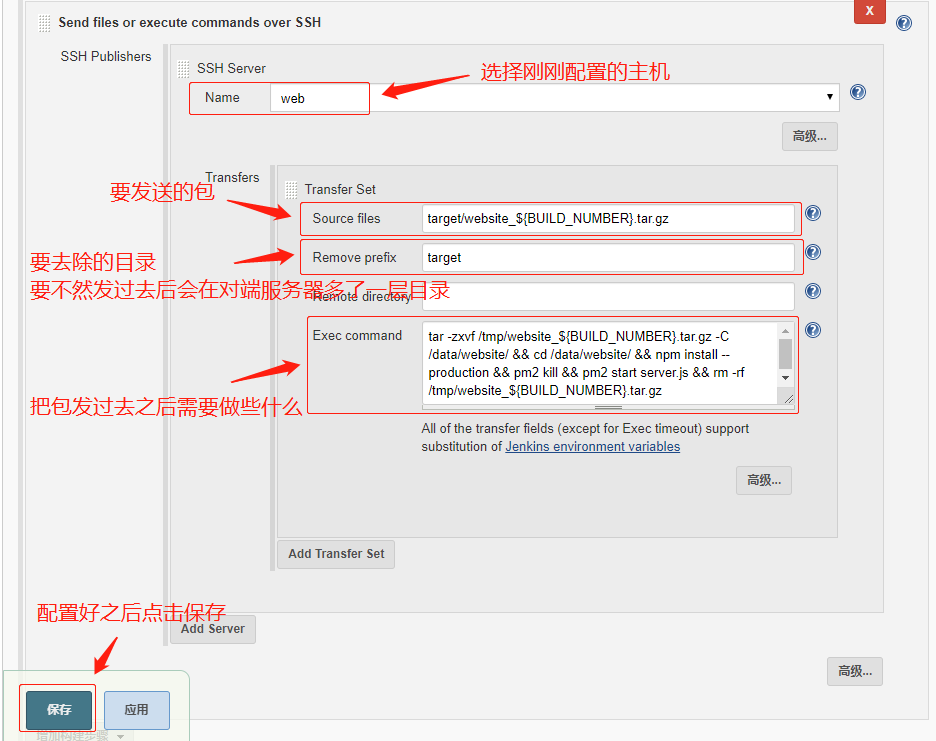
返回 gitlab 的钩子配置页面,模拟 push 操作
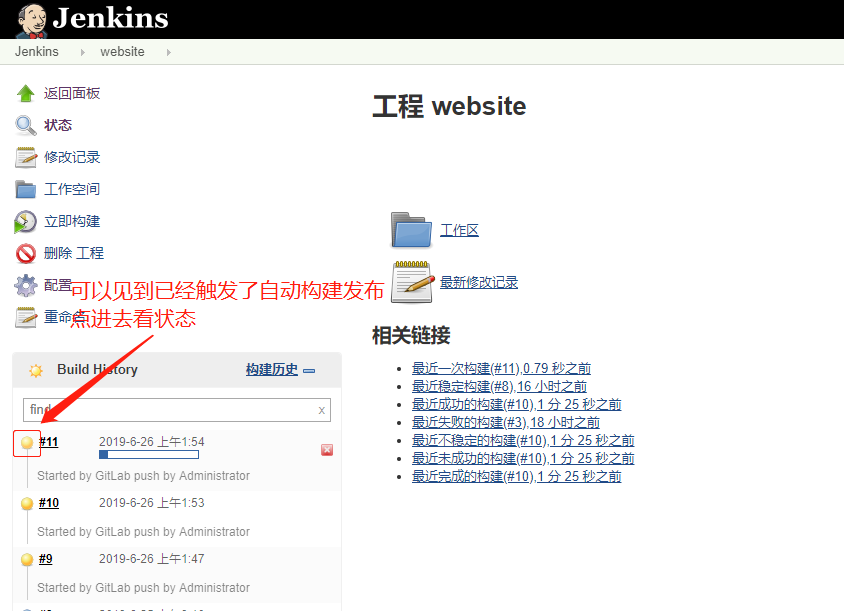
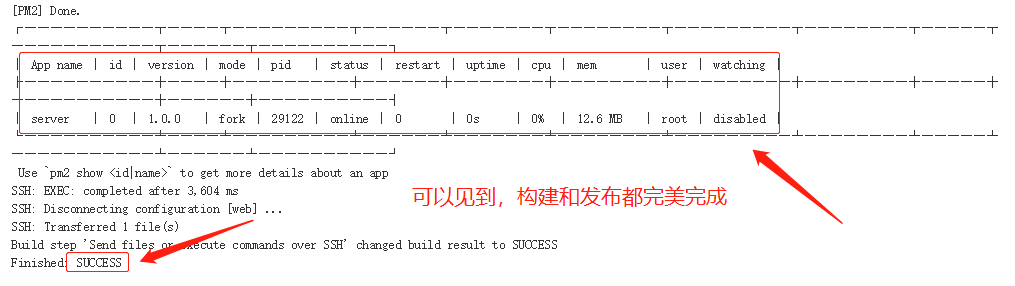
使用浏览器测试项目是否发布成功

这篇文章结束了
到这里,已经把 jenkins 和 gitlab 串联起来并做了自动化的构建发布
因为篇幅所限,下一篇文章将介绍如何把 ansible 引入到 jenkins 中做发布,同时也会讲到如何实现利用 jenkins 的 ${BUILD_NUMBER} 变量来实现回滚
本文链接:
/archives/auto_02
版权声明:
本站所有文章除特别声明外,均采用 CC BY-NC-SA 4.0 许可协议。转载请注明来自
Linux 小白鼠!
觉得文章不错,打赏一点吧,1分也是爱~
打赏
 微信
微信
支付宝